For users with significant mobility issues, a bath transfer bench provides fundamentally greater safety than a shower chair due to its wider base of support that extends outside the tub.
- Shower chairs often become unstable in standard tubs, which are typically 30% narrower at the bottom, causing the chair’s legs to splay.
- Sliding transfer benches are non-negotiable for users with poor upper body strength or fragile skin, as they eliminate dangerous scooting and skin-damaging shear forces.
Recommendation: Always choose a transfer bench over a shower chair for tub bathing if the user cannot safely step over the tub wall. Prioritize a sliding model if caregiver assistance is needed or if the user has notable weakness.
For a caregiver, the moment a loved one with mobility challenges needs to bathe is filled with anxiety. The fear of a slip, a fall, or the simple inability to get in and out of the tub safely is a heavy burden. The most common advice is to “get a shower chair,” a seemingly simple solution. However, this often overlooks a critical reality of physics and human biomechanics. The standard shower chair, while useful in a walk-in shower, can become a significant hazard in a traditional bathtub.
The real issue isn’t just about providing a place to sit. It’s about creating a stable, engineered system for transferring a person’s body weight across the barrier of the tub wall. This requires understanding the relationship between the user’s center of gravity, the equipment’s base of support, and the unforgiving geometry of the bathtub itself. The choice is not merely between two products, but between two fundamentally different mechanical approaches to a transfer.
But what if the key to safety wasn’t just the equipment, but the precise technique used with it? The true solution lies in a more detailed analysis. This guide moves beyond a simple product comparison to provide a stability-focused framework. We will dissect the mechanics of a safe transfer, analyze why standard chairs fail in narrow tubs, and detail how to match the equipment to the user’s specific body, not just the bathroom.
For those who prefer a visual summary, the following video offers an excellent overview comparing the primary functions of tub transfer benches and standard shower chairs, setting the stage for the detailed analysis in this article.
This article provides a detailed breakdown of the critical factors that determine the safest bathing choice. By exploring the correct transfer techniques, equipment measurements, and environmental setup, you will gain the specialist knowledge needed to make a confident and secure decision.
Summary: A Stability Analysis for Heavy Users & Narrow Tubs
- How to slide into a bathtub safely using a transfer bench?
- Why most standard shower chairs don’t fit securely in narrow bathtubs?
- How to adjust bench height to match your specific knee-to-floor measurement?
- The curtain error with transfer benches that floods your bathroom floor
- Sliding vs stationary seats: when is the extra cost worth it?
- Which 3 muscles must be strong to get off the toilet without using hands?
- Long-handled brushes: how to comb hair when you can’t raise your arm?
- How to Choose Anti-Slip Flooring That Reduces Fall Risks by 50% in Wet Areas?
How to slide into a bathtub safely using a transfer bench?
A transfer bench is not just a seat; it’s a bridge. Using it correctly is a choreographed technique that protects the user from falls and the caregiver from back strain. The goal is to move the body’s center of gravity smoothly and with control, avoiding any sudden or twisting motions. Mastering this “Sit, Pivot, Slide” method is fundamental to bathing safety and builds the user’s confidence. The entire sequence should be practiced several times fully clothed in a dry tub to build muscle memory before the first wet run.
The process is divided into three distinct phases:
- SIT Phase: The user approaches the bench from the outside of the tub, walking backward until the backs of their legs touch the edge of the seat. Using the armrests for support, they should perform a controlled descent, feeling the bench behind them before committing to sitting. This prevents a sudden drop that can cause injury or instability.
- PIVOT Phase: Once securely seated, the user lifts and rotates one leg at a time over the tub wall. This movement must originate from the hips, not by twisting the spine. The user should be firmly planted on the bench, using their arms for stability as they bring their legs into the tub.
- SLIDE Phase: This is the most critical step. Instead of “scooting” with the hips, which creates dangerous shear forces on the skin, the user should use their arm strength to unweight their body and slide across the bench seat into the final bathing position. Reversing the process to exit the tub follows the exact same steps in reverse order.
After bathing, it is crucial to dry the feet and the floor area around the bench before attempting to stand. This final step mitigates the risk of a slip-and-fall accident on a wet surface, a common but preventable hazard.
Why most standard shower chairs don’t fit securely in narrow bathtubs?
The primary reason standard shower chairs fail in bathtubs is a fundamental mismatch of geometry. Most caregivers and users measure the tub width at the top edge, assuming it’s a consistent dimension. However, the vast majority of bathtubs are designed with tapered walls for molding and drainage. In fact, comprehensive measurements reveal that most bathtubs are 30% narrower at the bottom than at the top edge. This creates an unstable and dangerous situation for a four-legged shower chair.
This tapering forces the chair’s legs to splay outwards at an unsafe angle, dramatically reducing its base of support. The chair is no longer resting on four stable points; it’s precariously balanced on the edges of its rubber feet. For a heavy user, any shift in weight can cause the chair to slip, tilt, or collapse. The illustration below demonstrates how the leg splay occurs due to the tub’s internal slope.
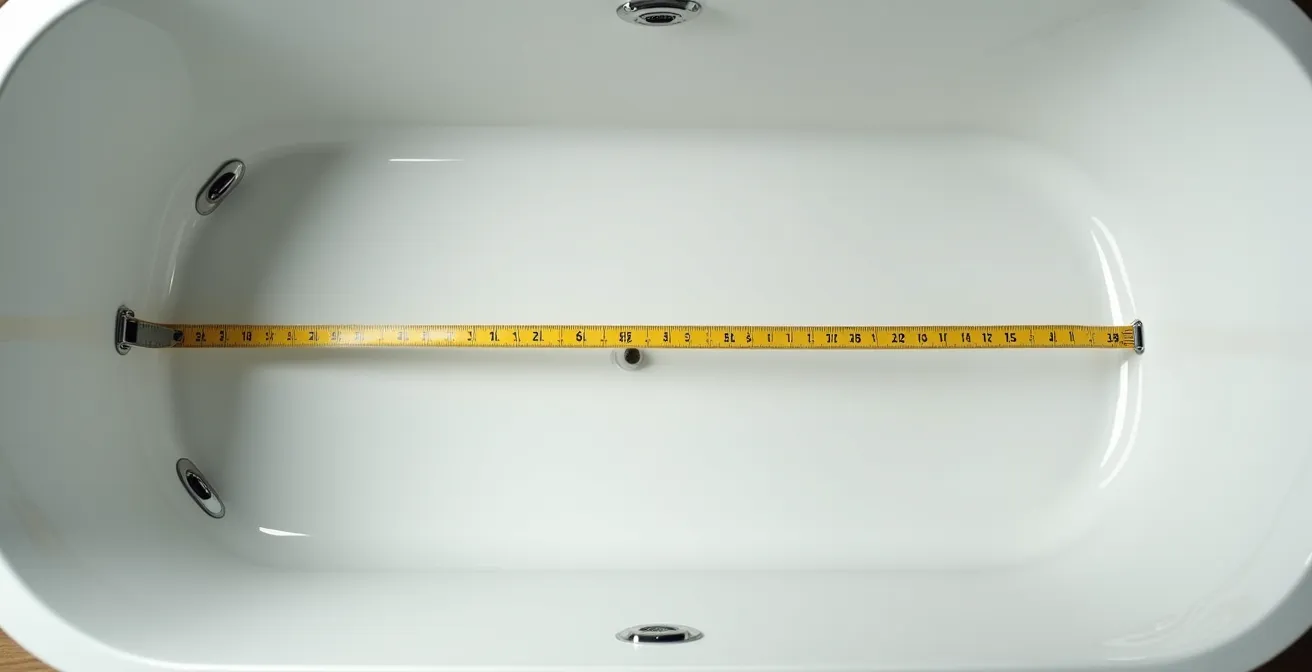
In contrast, a transfer bench is inherently more stable because two of its legs rest firmly on the bathroom floor outside the tub, creating a much wider and more secure base of support. This design completely bypasses the problem of tub tapering. To ensure a safe fit for any in-tub equipment, a precise measurement protocol is not just recommended; it’s mandatory.
This table outlines the essential measurements required to assess if any shower seating can be safely used in a specific tub. Ignoring these details is a common source of equipment-related falls.
| Measurement Point | Why It Matters | Common Error |
|---|---|---|
| Internal width at tub bottom | Chair legs must fit flat here, not on the curve. This is the most critical dimension for a shower chair’s stability. | Only measuring the tub width at the top edge and assuming it’s uniform. |
| Height of tub wall | This determines the necessary leg adjustment range for a transfer bench to sit level across the wall. | Forgetting to measure from the tub floor to the top of the wall, leading to a tilted bench. |
| Distance from floor to inner curve | The radius of the tub’s inner curve affects the stability angle of the chair legs. A larger radius provides less flat surface. | Ignoring the curved surfaces where the tub floor meets the walls, placing legs on an unstable incline. |
How to adjust bench height to match your specific knee-to-floor measurement?
Properly adjusting the height of a transfer bench is a critical step in creating a safe bathing environment. This isn’t about generic comfort; it’s about biomechanics and achieving an “anthropometric match”—tailoring the equipment to the user’s specific body dimensions. The goal is to create a seating position that makes standing up easier, not harder. A common mistake is to set the seat too low, forcing the user to expend significant muscular effort to stand.
The optimal seat height leverages gravity to assist with the sit-to-stand motion. The seat should be adjusted so the user’s hips are slightly higher than their knees when seated. This downward-sloping thigh angle shifts the center of gravity forward, making it mechanically easier to initiate the standing movement. For example, many modern transfer benches feature quick-change legs with indentation markings that allow for precise height adjustments, often in 1/4-inch increments, across a range from 16 to 23 inches to accommodate various user heights.
Follow this protocol for a precise and safe height adjustment:
- Set Hip-Knee Angle: Adjust the outer legs (on the bathroom floor) so that when the user is seated, their hips are positioned slightly higher than their knees. Avoid a perfect 90-degree angle, which is less efficient for standing.
- Apply Two-Finger Clearance Test: Ensure there is enough space to easily fit two fingers between the back of the user’s knee and the front edge of the bench. This prevents the bench from cutting off circulation in the legs.
- Compensate for Tub Height: Adjust the inner legs (inside the tub) to be shorter than the outer legs. This compensates for the height difference between the bathroom floor and the bottom of the tub.
- Verify Level Seat: Once all legs are adjusted, place a level (or a smartphone level app) on the seat to confirm it is perfectly level. A tilted seat is an unstable seat.
- Mark the Settings: For consistency, mark the optimal height settings on the bench legs with a piece of removable tape or a permanent marker. This saves time and ensures safety for future use.
The curtain error with transfer benches that floods your bathroom floor
One of the most common and frustrating problems with a transfer bench is water management. Because the bench straddles the tub wall, it creates a gap in the shower curtain, allowing water to spray out and flood the bathroom floor. This not only creates a messy cleanup but, more importantly, introduces a serious slip-and-fall hazard right where the user will be standing up. While many people attempt makeshift solutions, there is a clear hierarchy of effectiveness for managing water.
However, the most effective strategy of all is to address the root cause of the problem: the direction of the water spray. As one equipment study noted, “A handheld shower head is highly recommended any time somebody’s going to be doing a seated shower.” This simple device allows the user to direct the water spray downwards towards the drain and away from the curtain opening, effectively solving the flooding issue at its source. It transforms the situation from a defensive battle against escaping water to a controlled and contained shower experience.
Combining a handheld showerhead with a proper curtain technique provides a complete water management system. The following checklist outlines the best practices for setting up your shower curtain, from a basic fix to an optimal solution.
Your Action Plan: The Water Management Checklist
- Assess your current setup: Do you have one or two curtains? Is a handheld showerhead installed?
- Implement the “Good” solution: Start by testing the simple tuck-in method. Bunch the shower curtain liner and stuff it into the gap created by the transfer bench.
- Upgrade to “Better” if needed: If the tuck-in method fails, purchase an inexpensive vinyl liner and carefully cut two vertical slits to fit snugly around the bench’s support struts.
- Invest in the “Best” setup: For complete coverage, install two overlapping shower curtains on the rod—one that hangs entirely inside the tub and one that hangs outside.
- Optimize with the root-cause solution: Install a handheld showerhead to give the user full control over water direction, making curtain gaps almost irrelevant.
Sliding vs stationary seats: when is the extra cost worth it?
The choice between a stationary and a sliding transfer bench is a critical decision point that directly impacts user safety and caregiver ergonomics. While a stationary bench requires the user to unweight their body and slide their hips across the seat, a sliding bench does the work for them, gliding smoothly on rails. This feature comes at a higher cost, but in certain situations, it is not a luxury—it is a medical necessity.
The primary benefit of a sliding seat is the dramatic reduction of shear forces on the skin. Scooting across a stationary surface creates friction that can easily lead to skin tears, abrasions, and pressure sores, especially for seniors with fragile, thin skin. As one medical supplier, Performance Health, notes in their product review, “The smooth contoured seat is comfortable and prevents skin tears.” The sliding mechanism eliminates this friction, preserving skin integrity. This mechanism is clearly visible in the detailed view below.
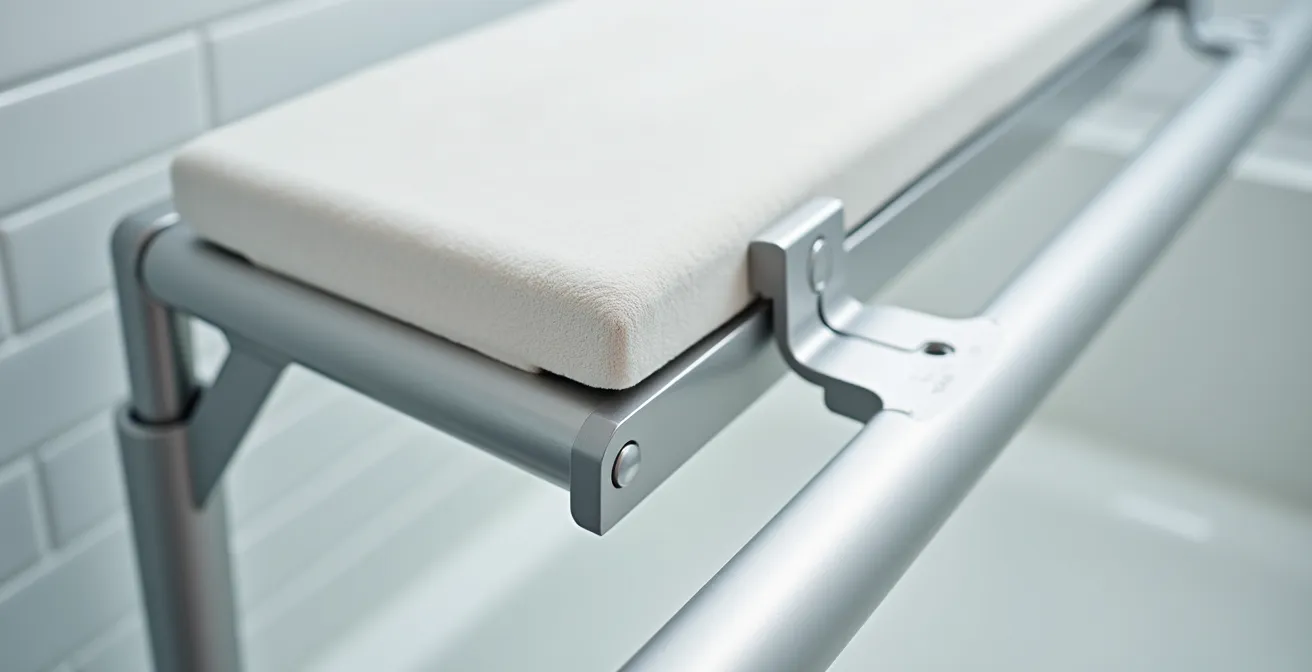
Furthermore, the sliding function is invaluable when a caregiver is assisting with the transfer. Pushing or pulling a user across a stationary bench puts immense strain on the caregiver’s back and shoulders. The sliding seat allows the caregiver to facilitate the transfer with minimal effort, protecting them from injury. The decision to invest in a sliding bench should be based on a clear assessment of the user’s condition and the level of assistance required.
This decision framework, based on data from a comparative analysis of bench types, clarifies when the additional cost of a sliding bench is justified.
| User Condition | Stationary Bench | Sliding Bench | Recommendation |
|---|---|---|---|
| Significant upper body weakness | Difficult and unsafe | Recommended | Sliding model is worth the extra cost. |
| Fragile skin/pressure sore risk | Higher risk of shear | Lower risk | Sliding model prevents shear forces on skin. |
| Caregiver assistance needed | High back strain risk | Ergonomic | Sliding model protects the caregiver from injury. |
| Good upper body strength | Adequate | Optional (convenience) | Stationary model is often sufficient. |
Which 3 muscles must be strong to get off the toilet without using hands?
While this article focuses on bathing, the underlying principles of safe transfers are universal. The ability to get on and off a toilet without using hands for support is a key indicator of lower body and core strength, and it relies on the same kinetic chain required for safely using bathing equipment. Understanding these key muscles helps identify physical weaknesses that might make a sliding transfer bench a necessity rather than an option.
The sit-to-stand motion, whether from a toilet or a transfer bench, is powered by a trio of crucial muscle groups working in concert:
- Quadriceps (Front of Thighs): These are the primary engines for extending the knee and lifting the body from a seated position. Weakness in the quadriceps is a major predictor of transfer difficulty.
- Gluteus Maximus (Buttocks): This powerful muscle is responsible for hip extension, providing the thrust needed to move the torso from a flexed to an upright position.
- Core Stabilizers (Abdominals and Lower Back): These muscles are the body’s foundation. They maintain trunk stability throughout the transfer, preventing the user from losing balance or slumping forward.
A weakness in any part of this kinetic chain can compromise the entire transfer. For instance, specific occupational therapy assessments show that users with less than 60% normal quadriceps strength often require sliding transfer benches for safe transfers. They simply lack the leg power to unweight their body and scoot across a stationary bench. Therefore, observing a person’s ability to stand from a chair or toilet provides critical diagnostic information for selecting the right bathing equipment.
Long-handled brushes: how to comb hair when you can’t raise your arm?
Safe bathing for someone with mobility issues is not just about the transfer in and out of the tub; it’s also about what happens during the bath itself. Reaching, twisting, and bending while seated on a wet, slippery surface are high-risk movements that can easily lead to a fall from the bench. Assistive tools like long-handled brushes are not mere conveniences; they are essential safety equipment designed to eliminate these dangerous movements.
For a user who cannot raise their arm to comb their hair or wash their back, or cannot bend forward to wash their feet due to hip precautions or poor balance, these tools are indispensable. As noted in a post-hip replacement showering guide, “Use the hand held shower head and long handled sponge to complete your shower. Make sure to avoid bending at the hips… These tools are essential for maintaining independence and safety.” They allow the user to remain in a stable, centered, and safe seated position throughout the entire bath.
For any transfer bench user, a small collection of these tools should be considered a standard part of the bathing kit. They directly contribute to fall prevention by bringing the task to the user, rather than forcing the user to risk reaching for the task.
- Long-handled sponge/brush: A tool with a 24 to 30-inch handle allows the user to wash their back and lower legs without any dangerous twisting or forward bending.
- Long-handled toe washer/scrubber: This specialized tool eliminates the need to bend at the hips, a critical precaution for post-surgery patients and those with severe back pain or poor balance.
- Handheld showerhead with a 60+ inch hose: This is arguably the most important tool. It brings the water to the user, eliminating the need for any risky reaching movements and providing full control over cleaning.
Key Takeaways
- The tapered design of most bathtubs makes standard shower chairs inherently unstable; a transfer bench is mechanically superior for tub use.
- Proper bench height adjustment (hips slightly higher than knees) is crucial for leveraging gravity to make standing up easier and safer.
- A sliding transfer bench is a necessary investment for users with significant weakness or fragile skin to prevent injury and reduce caregiver strain.
How to Choose Anti-Slip Flooring That Reduces Fall Risks by 50% in Wet Areas?
The safest transfer bench and the most perfect technique can be rendered useless if the user steps out onto a dangerously slick floor. The bathroom is the site of a staggering number of injuries; according to the Centers for Disease Control and Prevention, approximately 235,000 people are injured in bathroom falls each year. A wet tile floor can have a coefficient of friction near zero, offering no resistance to a slip. Choosing appropriate anti-slip flooring is not an aesthetic choice, but a critical component of a comprehensive fall prevention strategy.
The industry standard for measuring the slipperiness of a surface is the DCOF (Dynamic Coefficient of Friction) rating. This value quantifies how much grip a tile provides when wet. A higher DCOF rating means more grip and a lower risk of slipping. For residential bathrooms, especially those used by seniors or individuals with mobility challenges, selecting a tile with a DCOF rating of 0.42 or higher is the absolute minimum safety standard.
For interior level tile, wet DCOF around 0.42 is a general specifier baseline. Shower floors involve slope and soap, so choose products the manufacturer rates for shower use and verify cleaning instructions.
– Statewide Remodeling, Non-Slip Shower Floors for Seniors Guide
This expert advice highlights that the area immediately surrounding a tub or shower, which is subject to both water and soap residue, is even more demanding. For maximum safety in the “splash zone” around a transfer bench, aiming for a tile with an even higher DCOF rating is a wise investment in safety. The following table, based on industry safety guidelines, provides a clear framework for selecting the right flooring.
| Surface Type | DCOF Rating | Safety Level | Recommended For |
|---|---|---|---|
| Standard glossy tile | Below 0.42 | Unsafe when wet | Not recommended for bathrooms |
| Basic anti-slip/matte tile | 0.42-0.50 | Minimum safety | General residential use |
| Enhanced anti-slip tile | 0.50-0.60 | Good safety | Ideal for transfer bench landing zones |
| Medical-grade anti-slip | 0.60+ | Optimal safety | High-risk users, commercial/medical facilities |
To ensure a completely safe bathing environment, the next logical step is to have a professional occupational therapist or DME specialist assess the user’s specific needs and the unique geometry of the bathroom. This provides a personalized recommendation that accounts for all variables.