
In summary:
- Standard door hinges prevent the door from clearing the frame, reducing usable width by up to 2 inches.
- Offset (swing-clear) hinges reposition the door outside the doorway, maximizing the clear opening for walkers and wheelchairs.
- Installation is a direct replacement, typically taking under 15 minutes with only a screwdriver.
- Success depends on accurately measuring hinge radius, height, and screw pattern before purchase.
- For maximum accessibility, door removal is an option, but this involves significant privacy trade-offs.
The constant scrape of knuckles against a door frame is a frustratingly common experience for anyone navigating a home with a walker or wheelchair. This daily friction is a reminder that standard homes are not built with accessibility in mind. The most common advice is often to undertake a major, costly renovation to widen the entire doorway. This involves removing the frame, cutting drywall, and significant disruption.
A far simpler solution exists: replacing standard hinges with offset door hinges. While this sounds like a straightforward DIY fix, the internet is filled with generic advice that glosses over critical details. The real key to reclaiming that crucial space isn’t just swapping the hardware; it’s understanding the precise hinge geometry and measurement discipline required to select the correct product. A mistake in measuring a hinge radius or misunderstanding the difference between swing-clear and wide-throw types can lead to buying the wrong hardware, wasted money, and continued frustration.
This guide moves beyond the simple promise of “2 extra inches.” We will provide the technically precise, problem-solving approach of a hardware specialist. We’ll examine the physics of why your current doorway is narrower than it appears, provide a step-by-step installation process focused on integrity, and detail the critical measurements you must take. By focusing on the technical details that determine success or failure, you can execute this project with confidence and achieve a truly accessible home.
This article provides a detailed roadmap for widening your doorways using offset hinges. We will cover everything from the underlying problem to practical installation and even explore alternative solutions for a comprehensive approach to home accessibility.
Summary: Installing Door Wideners to Gain Clearance
- Why Standard Hinges Steal 2 Inches of Walkable Width from Your Doorway?
- How to Replace Standard Hinges with Offset Hinges in Under 15 Minutes?
- Swing-Clear vs Wide-Throw Hinges: Which One Solves Your Specific Problem?
- The Measuring Mistake That Leads to Buying the Wrong Hinge Radius
- When to Remove the Door Completely: Privacy vs Accessibility Trade-Offs
- How to Arrange Living Room Furniture to Create Clear Pathways for Walkers?
- 3-Wheel vs 4-Wheel: Which Scooter Fits in a Cruise Ship Cabin?
- How to Calculate Wheelchair Ramp Gradient to Ensure Easy Access for Seniors?
Why Standard Hinges Steal 2 Inches of Walkable Width from Your Doorway?
The core problem isn’t the width of the doorway itself, but the physics of a standard hinge. When you open a door, a conventional hinge pivots within the door jamb. This means the edge of the door and the hinge barrel itself remain inside the frame’s opening, creating an obstruction. This seemingly minor detail is the primary reason why a 32-inch door provides significantly less than 32 inches of clear, usable space. The loss of space is a direct result of this inefficient hinge geometry.
Several factors combine to reduce the effective clear opening width:
- Door Thickness: A standard interior door is about 1.75 inches thick. When opened to 90 degrees, this entire thickness sits within the pathway, immediately reducing clearance.
- Hinge Barrel Position: Traditional hinges are designed to keep the door aligned with the frame when closed. A consequence of this design is that the hinge’s pivot point and barrel protrude into the opening when the door is ajar.
- Door Stop Molding: The thin strip of wood or MDF inside the frame that the door rests against when closed can steal another half-inch to an inch of width.
An offset hinge, also known as a swing-clear hinge, fundamentally changes this geometry. Its unique L-shaped design moves the pivot point outside of the door frame. When opened, the door swings completely clear of the opening, resting parallel to the wall. This simple change in physics is how you can gain up to 2 inches of clearance gained with offset hinges, instantly transforming a tight passage into a navigable one. This modification allows you to use the full, true width of your door frame without any structural changes.
How to Replace Standard Hinges with Offset Hinges in Under 15 Minutes?
Replacing your existing hardware with offset hinges is a high-impact project that requires precision but not specialized skills. The key to a quick and successful installation is a methodical approach that ensures the installation integrity is maintained. You will only need a screwdriver (manual or electric) and your new set of hinges. For safety, it’s wise to have someone assist you in holding the door, although it can be done solo by propping the door up with books or shims.
This process is a direct replacement, meaning you will use the existing screw holes in both the door and the door jamb. This is critical as it maintains the structural soundness of the installation without requiring new drilling. Follow these steps for a smooth swap.
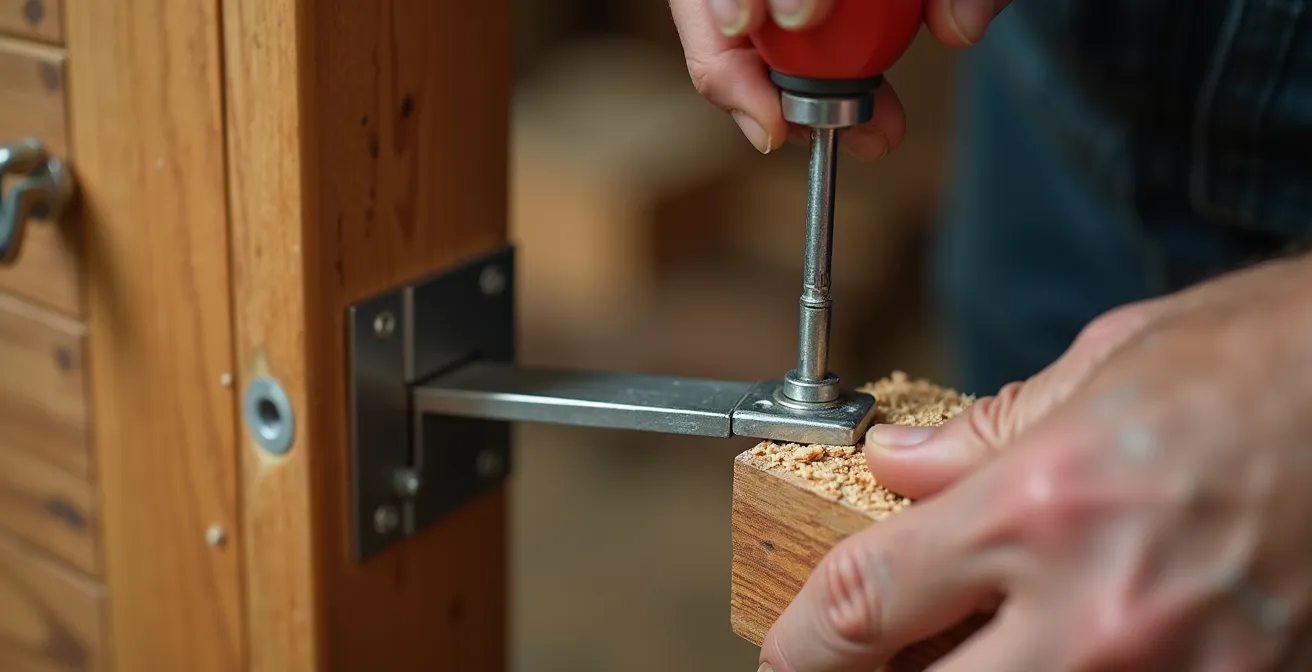
As you can see, the distinct ‘dog-leg’ shape of the hinge is what repositions the door. The process is straightforward:
- Remove Existing Hinges: With the door closed, remove the screws from one hinge on the door jamb side first, then the door side. It’s often best to start with the middle hinge, then the bottom, and finally the top, which allows the door to remain stable. Save all screws.
- Attach Hinge to Door: Align the new offset hinge with the existing screw holes on the door. The side with the countersunk holes should be facing you. Secure it using the original screws.
- Attach Hinge to Jamb: Prop the door back in place and attach the other side of the offset hinge to the door jamb, again using the existing holes and original screws.
- Repeat for All Hinges: Repeat the process for the remaining hinges. Installing the middle hinge first provides the most stability.
- Test the Swing: Open and close the door several times to ensure it swings freely and clears the frame completely without binding or rubbing.
Swing-Clear vs Wide-Throw Hinges: Which One Solves Your Specific Problem?
While “offset hinge” is a common term, the hardware market includes different types designed for specific problems. The two most relevant for accessibility are swing-clear hinges and wide-throw hinges. Choosing the wrong one is a common mistake. A swing-clear hinge is the standard solution for gaining clearance in a typical interior doorway. A wide-throw hinge, however, is designed for a different challenge: clearing deep wall moldings or obstructions adjacent to the door.
The primary function of a swing-clear hinge is to move the door entirely out of the frame’s path, maximizing the clear opening. This is the ideal solution for wheelchair and walker access in standard hallways. A wide-throw hinge features an extra-long barrel that pushes the door further away from the wall when opened, allowing it to swing past thick trim or baseboard heaters. This requires significantly more clear wall space behind the open door.
This comparative table breaks down the critical differences to help you make the right technical choice.
| Feature | Swing-Clear Hinges | Wide-Throw Hinges |
|---|---|---|
| Primary Function | Moves door completely out of frame opening | Swings door past thick wall molding |
| Clearance Gained | Up to 2 inches | Up to 3 inches |
| Wall Space Required | Standard door swing space | Requires 4+ inches clear wall space behind door |
| Best For | Standard interior doors, wheelchairs, walkers | Doors with thick molding or adjacent furniture |
| Installation Difficulty | Easy – direct replacement | Moderate – may require frame adjustment |
Case Study: Healthcare Facility Hinge Implementation
To understand the real-world application, consider how healthcare facilities use this hardware. A report on hardware standards notes that healthcare facilities commonly install swing-clear hinges in patient corridors. This prevents damage to door edges from carts and hospital beds while maximizing the 32-inch minimum clear opening required by ADA standards. A key consideration for these facilities is that overhead door closers must be repositioned, as the hinge barrel moves along with the door, unlike with standard hinges.
The Measuring Mistake That Leads to Buying the Wrong Hinge Radius
The single most common reason for failure in this project is a lack of measurement discipline. While the concept of an offset hinge is simple, the hardware itself is manufactured to precise specifications. Ordering a hinge with the wrong radius, height, or screw pattern will make a 15-minute job impossible. Before you add anything to an online shopping cart, you must physically verify the specifications of your existing hinges.
The most crucial—and most frequently overlooked—measurement is the hinge corner radius. Hinges are mortised into the door and frame with either square corners or rounded corners. For rounded corners, there are two standard sizes. According to accessibility hardware specialists, the two standard radius options are 1/4-inch and 5/8-inch. A simple trick to measure this without special tools is to use coins: a nickel has a radius that closely matches the 1/4-inch corner, while a dime fits neatly into a 5/8-inch radius corner. Buying a square-cornered hinge for a rounded mortise (or vice versa) will prevent it from sitting flush and compromising the installation.
Beyond the radius, you must confirm hinge height (typically 3.5 or 4 inches for residential doors) and the screw hole pattern. Some hinges use a straight line of screws, while others use a zig-zag or staggered pattern. Your new hinges must match the existing pattern to use the pre-drilled holes.
Your Pre-Purchase Hinge Verification Checklist
- Measure Hinge Radius: Use a dime for a 5/8-inch radius or a nickel for a 1/4-inch radius to check the corner curve of the hinge mortise.
- Check Screw Hole Pattern: Remove one hinge and verify if the screw holes are in a straight line or a zig-zag pattern.
- Confirm Hinge Height: Measure the height of your existing hinges from top to bottom. They will typically be 3.5 or 4 inches.
- Verify Door Thickness: Measure the thickness of your door. Offset hinges are generally designed for standard doors between 1-3/8 and 1-3/4 inches thick.
- Check Wall Clearance: For the hinge to function, confirm you have at least 3 inches of clear wall space behind the door when it is fully open.
When to Remove the Door Completely: Privacy vs Accessibility Trade-Offs
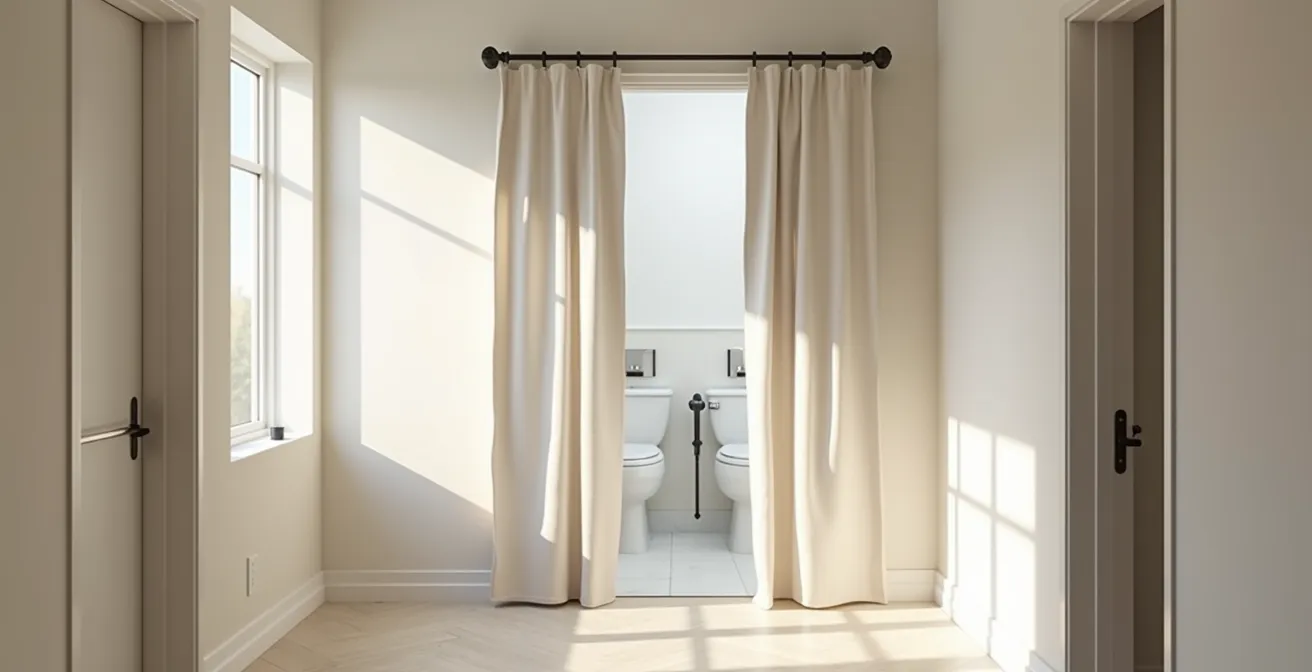
While offset hinges are an excellent solution, there are situations where even the extra two inches are not enough. For very narrow doorways or for users of wider mobility devices, the ultimate solution for accessibility is to remove the door entirely. This decision, however, introduces a critical accessibility trade-off between total freedom of movement and the need for privacy. The importance of privacy varies dramatically from room to room, making this a case-by-case decision.
For high-traffic, low-privacy transitions, such as between a living room and a hallway or a kitchen entry, removing the door is often the best choice. It creates an open, seamless flow and eliminates any possibility of collision. For rooms where privacy is paramount, like bedrooms and especially bathrooms, removing the door is not a viable option without an alternative. In these cases, solutions like heavy privacy curtains on tension rods, accordion doors, or bi-fold doors can provide a compromise, offering a barrier without the obstructive swing of a traditional door.
This decision matrix can help guide your choice based on the function of the room and the psychological importance of maintaining privacy and dignity.
| Room Type | Privacy Need | Best Alternative to Door | Psychological Impact |
|---|---|---|---|
| Bathroom | High | Heavy privacy curtain on tension rod | Significant – maintain dignity options |
| Bedroom | High | Accordion or bi-fold door | Moderate – personal space important |
| Living to Hallway | Low | Remove door or use decorative curtain | Minimal – public space |
| Kitchen Entry | Low | Remove door completely | Minimal – improves flow |
How to Arrange Living Room Furniture to Create Clear Pathways for Walkers?
Widening a doorway is only half the battle. A perfectly accessible entrance that leads into a cluttered room is ineffective. Creating clear, wide pathways is just as important as modifying the door itself. The goal is to design a living space that allows for easy, unimpeded navigation. According to ADA accessibility standards, a 32-inch minimum clear opening is required for wheelchairs, and maintaining a similar or wider path throughout a room is a best practice for all mobility device users.
The first step after installing offset hinges is to physically mark the new, wider door swing on the floor with painter’s tape. This visual guide ensures no furniture is placed within the door’s arc of movement. The next priority is to establish clear “landing zones” on both sides of the doorway—a clear space of at least 5×5 feet allows a person using a wheelchair to turn around completely.
To optimize the room layout for accessibility, follow these guidelines:
- Maintain 36-Inch Pathways: Ensure all primary traffic routes—from the door to the sofa, from the sofa to a chair—are at least 36 inches wide. This provides ample room for a walker or wheelchair to pass without issue.
- Position Furniture Against Walls: Whenever possible, arrange large furniture items like sofas, bookshelves, and entertainment centers along the walls. This keeps the central area of the room open and easy to navigate.
- Remove Trip Hazards: Area rugs, particularly those with high pile or curled edges, are significant trip hazards. Remove them from main pathways. If a rug is necessary, ensure it is low-pile and securely taped down on all edges.
- Consider Coffee Table Alternatives: A large, central coffee table can be a major obstacle. Consider replacing it with smaller end tables next to seating areas to keep the main pathway clear.
3-Wheel vs 4-Wheel: Which Scooter Fits in a Cruise Ship Cabin?
The principles of clear opening width and maneuverability extend beyond the home and are especially critical in compact environments like a cruise ship cabin. When choosing a mobility scooter for travel, the key specification to consider is the turning radius. This determines how easily the scooter can navigate narrow hallways and tight corners inside a cabin. The debate between 3-wheel and 4-wheel models often comes down to a trade-off between stability and agility.
A 3-wheel scooter has a significantly tighter turning radius, typically between 32 and 38 inches. This makes it far more adept at navigating the narrow doorways and confined spaces of a standard cruise cabin. A 4-wheel scooter offers superior stability, especially on varied terrain, but its turning radius is much larger, often 43 to 53 inches. This can make it difficult or impossible to maneuver inside a cabin without performing multi-point turns.
For cruise ship travel, a 3-wheel scooter is almost always the superior choice for indoor use, as shown in this comparison.
| Feature | 3-Wheel Scooter | 4-Wheel Scooter |
|---|---|---|
| Turning Radius | 32-38 inches | 43-53 inches |
| Doorway Navigation | Excellent – tight turns | Good – requires more space |
| Stability | Good on smooth surfaces | Excellent on all surfaces |
| Cruise Cabin Suitability | Best choice for narrow spaces | May struggle with tight corners |
| Threshold Clearance | 1.5-2 inches typical | 2-2.5 inches typical |
Case Study: Cruise Ship Accessibility Retrofits
Cruise lines are increasingly aware of these challenges. Modern ships are built to meet ADA requirements, but older vessels often feature very narrow cabin and bathroom doors. As a result, many cruise lines are retrofitting cabins to improve accessibility. One report on hardware implementation notes that ships built after 2024 increasingly use offset hinges in cabin bathrooms. The tight 24-inch bathroom doors on older ships have been identified as a major barrier, leading to the adoption of swing-clear hinges that provide the crucial extra inches needed for standard transport wheelchairs.
Key Takeaways
- The primary barrier in a doorway is not its width, but the inefficient geometry of standard hinges that leaves the door inside the opening.
- Offset (swing-clear) hinges solve this by moving the pivot point, allowing the door to swing completely out of the pathway and adding up to 2 inches of usable space.
- Before purchasing, you must accurately measure hinge height, screw pattern, and corner radius (using a dime/nickel trick) to ensure compatibility.
How to Calculate Wheelchair Ramp Gradient to Ensure Easy Access for Seniors?
A perfectly widened doorway is of little use if it cannot be safely reached. The transition from the ground to the threshold is often the first barrier, and a properly constructed ramp is the solution. However, not all ramps are created equal. The most critical factor for safety and ease of use is the ramp’s gradient, or slope. A ramp that is too steep can be difficult to ascend and dangerous to descend.
The standard for accessibility is set by the Americans with Disabilities Act (ADA). As specified in ADA accessibility guidelines, a 1:12 slope ratio is the maximum grade allowed for public ramps. This means that for every 1 inch of vertical rise (the height of the threshold from the ground), the ramp must have at least 12 inches of horizontal length. For a senior using a manual wheelchair or a walker, an even gentler slope of 1:16 or 1:20 is often recommended to reduce the energy expenditure required.
Once the ramp is in place, the transition into the doorway itself must be secure. A widened doorway is a key part of this system, as navigating the turn from a steep ramp into a tight opening is a common point of difficulty.
- Level Landing: The ADA requires a flat, level landing of at least 5×5 feet at the top of the ramp before the door. This provides a stable area to stop, open the door, and enter safely.
- Door Swing: The door should always open away from the ramp (inward) to prevent a person from having to back down the ramp to get the door open.
- Handrails: For any ramp with a slope exceeding 1:20, handrails on both sides are essential for stability and safety.
Installing offset hinges on the entry door is a crucial final step in this process, as the extra clearance makes the final turn from the landing into the home significantly easier and safer.
By applying these technical principles with precision, you can permanently solve the daily frustration of narrow doorways and create a safer, more accessible home environment. The next logical step is to take these measurements and select the right hardware for your specific needs.